Tuesday 1 April 2014

How to Reveal/View Password Hidden under Asterisks? Simple way

Most of the browsers have capability of remembering the user name and password which helps us to login more quickly in our favorite sites like Facebook, twitter, Gmail etc. with the help of this features you don’t need to type user name and password every time when you want to sign in to your favorite site. Since you are not typing your password anymore and thus you will forget your password in few days and then you cannot reveal or predict the password, because of security reason the password field of all browsers are masked with asterisks or dots which would not allows anyone to see original password even user. So cannot know or reveal the password by simply looking at the browser password field. But there is couple of way to reveal the password hidden under asterisks in your web browser and in this article we are discussing about how to reveal/view password hidden under asterisks in web browser.
                                                        
View+hidden+password


Steps to Reveal/view Password Hidden under Asterisks

Mozilla Firefox and Opera

For Mozilla Firefox and Opera browser you can reveal or view password hidden under asterisks by using inbuilt Inspect Element features of the browser. So follow the steps below
  • Open the site that ask you to sign in (Facebook, Gmail) and where your user name and password already remembered by the browser.
  • Now Right click on Password field of browser and select Inspect Element.
  • After that Inspect Element will open where you will see HTML code and here just find the word Password and replace with the word text.
                              replace%252520password%252520with%252520text%25255B8%25255D
  • Now it will reveal the password hidden under asterisks in the password field of the browser.
                         reveal%252520the%252520password%25255B11%25255D

Google Chrome

In case of Google Chrome you can reveal the hidden password by using above method.
  • Open the site and Right click on Password field of browser and then select Inspect Element.
  • After that Inspect Element will open and just find the word Password and replace with the word text in the HTML code and it will show you the hidden password under asterisks.
                    chro%25255B12%25255D

Also there is another way to revel the hidden password by using JavaScript which is quite simple and easy.

  • Open the site’s login page where you password is already remembered.
  • Now copy the blow code and paste it in the address bar of your browser.
JavaScript: alert(document.getElementById('Passwd').value);
  • After entering the above code in the address bar, hit Enter and a popup window will appear where your password written on it.
                                         javascript%252520reveal%252520password%25255B8%25255D

Internet Explorer

In case of Internet Explorer you can reveal the hidden password in the same way like Mozilla Firefox and Google Chrome.

Conclusion

There are so many ways to revel or view hidden password under asterisks in web browser, but the above method are safe and best. Also you can use third party tools to reveal hidden password, but if you use third party tools then anyone can reveal the password using same way, have permission to access your computer.
We hope you like this ,if so then share with your friends


How to Transform Windows 7 into Alienware? Make your PC Alienware

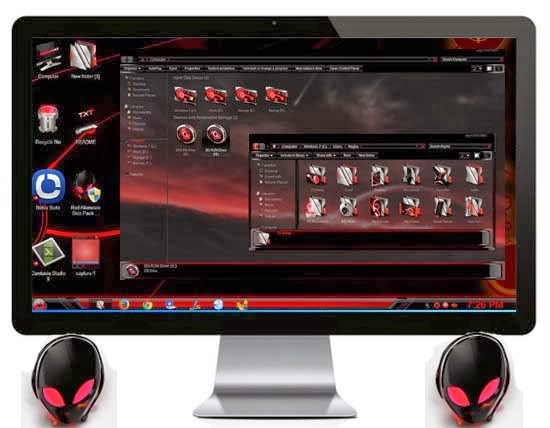
Alienware is a well known name in the PC market from Dell. It is designed for delivering the ultimate gaming experience to the users through the most advance technology. In the Alienware system everything is customized like Theme, Drive icon, Folder style, Desktop icon and style, Logon screen, Start menu etc and its graphics are better than normal windows 7. If you get bored with the normal windows 7 theme and its appearance and looking for something new which makes your PC impressive then we suggest you to use Alienware. If you want it in your windows 7 PC then it’s possible to transform windows 7 to Alienware without installing windows. To enhance the appearance of your computer a dedicated collection of graphics called Alienware Skin Pack is available which will transform your windows 7 PC into Alienware .today we will discussing how to install Alienware Skin Pack and how to transform windows 7 into Alienware without installing windows.                                      
Transform+Windows7+into+Alienware
                                                                   

What change will occur after installing Alienware Skin Pack?

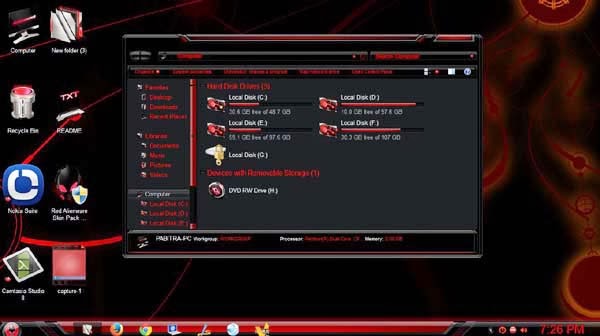
After installing Alienware Skin Pack in your computer, you will be able to enjoy new theme with Alienware style. It will completely change your desktop icon, mouse pointer, drive icon, logon screen, task bar, start menu and all type of icon to Alienware.
This pack also brings a new doc that is specific to Alienware system. Also you can change its looks and placement, make it hide automatically and appear after hovering the mouse near doc’s location.

Steps to install Alienware Skin Pack and transform windows 7 into Alienware

The installation procedure is quite straightforward, but before proceeding it is highly recommended top backup some system32 files from windows PC, Although during installation it backup the files itself. The files are given below
For 32 bit:
C:\Windows\System32\imageres.dll
C:\Windows\System32\shell32.dll
C:\Windows\System32\imagesp1.dll
C:\Windows\System32\zipfldr.dll
For 64 bit:
C:\Windows\System32\imageres.dll
C:\Windows\System32\shell32.dll
C:\Windows\System32\imagesp1.dll
C:\Windows\System32\zipfldr.dll
C:\Windows\SysWOW64\imageres.dll
C:\Windows\SysWOW64\shell32.dll
C:\Windows\SysWOW64\imagesp1.dll
C:\Windows\SysWOW64\zipfldr.dll
It is recommended to backup the above files because if anything goes wrong during installation or un-installation then the above backup files help you to get rid of the problem. So backup the above files and follow the below steps to install.
  • First of all download Alienware Skin Pack for 32 bit or Alienware Skin pack for 64 bit system as your wish. There are many Alienware Skin packs like Red, Green, Blue are available but we recommend Red Alienware Skin pack.
  • After downloading just double click on it and start installation. Wait few second for complete installation. 
                                                 
Installing+Alienware+Skin+pack

  • After installation it ask you to reboot you computer and then you must restart your computer because it is required for the changes to come into effect.
That’s all. After restarting your PC you will see that windows are completely transformed into Alienware.
                                                       
windows+7+into+Alienware

Steps to Un-installation Alienware Skin pack

If you want to get back into normal theme and appearance of windows 7 then just un-installation it from control panel of your computer. But during un-installation check the 1st and 2nd box and leave the 3rd box blank and then click on uninstall and reboot your computer.
                                                   
Uninstall+Alienware+Skin+Pack

Conclusion

This is the process to transform windows 7 into Alienware. Here we discussing about Red Alienware Skin pack, also you can use Green Skin pack or Blue skin pack through same way. Hope you must like this, if so then share with your friends and give your feedback here.
During this operation if you face any problem then comment below, we will help you.


How to Increases download speed of µTorrent? 

µTorrent is a powerful and efficient Bit Torrent client that allows you to download Torrent files directly. µTorrent is the best Torrent client that offers much greater download speed as compared to other Torrent clients. But some people are not satisfied with its downloading speed. If you are one of them then read this article, today we are going to share some tricks and tweaks which helps you to get maximum downloading speed on µTorrent. In this tutorial we will tweak the default settings of µTorrent which makes the download faster.                                                                       
Increases+u+torrent+download+speed

Steps to Increases downloading speed on µTorrent

First of all make sure you have the latest version of µTorrent. If you don’t have then Download µTorrent and install it on your PC and then follow the below steps.

Change Connection Settings

  • Open µTorrent and Go to Options and then select Preferences (Options -> Preferences).
  • A new window will appear and click on Connection from the left pane of the window.
  • Change the default Random Ports Value to 45682.
  • Now Uncheck Enable UPnP port mapping.

change+connection+settings
 

Change Bandwidth Settings

  • Now click on Bandwidth.
  • Change the value of Maximum upload rate to 10.
  • Change the value of Global maximum number of connections to 2329.
  • Change the value of Maximum number of connected peers per torrent to 1890.
  • Change Number of upload slots per torrent to 14.
Bandwidth+setting

Change Bit Torrent Settings

  • Click on Bit Torrent.
  • Now change Protocol Encryption outgoing from Disabled to Enabled.

bit+torrent+setting

Change Queuing Settings

  • Click on Queuing and made this changes.
  • Change the value of Maximum number of active torrents (uploads or downloads) to 10.
  • Change the value of Maximum number of active downloads to 10.
  • Change Minimum ratio (%) from 150 to 0.

queuing+setting
 

Change Advanced Settings

  • Click on Advance.
  • Now change bt.allow _ same _ ip value from false to true.
  • Change bt.connect _ speed value from 7 to 130.
  • Change dht.rate value from -1 to 2.
  • Change gui.show _ notorrents _ node value from true to false.
  • Change net.max _ halfopen value from 100 to 120.
  • Change rss.update _ interval value from 15 to 20.
  • Finally click on apply.
That’s all and you are done. Now you can enjoy high speed downloading on µTorrent.

Conclusion

These are some tweaks which will increases downloading speed on µTorrent. But You must be keeping in your mind that, this above tricks and tweaks can not increase your internet bandwidth speed provided by your internet service provider. This method is proved to provide constant speed for torrents having low Seeders or Peers.
If you have any further queries feel free to ask by commenting below.


How to block a website on your computer? block website in windows7/8 

Now day's internet becomes most essential things for all of us and it makes our life easy and fun. But internet has some good side and has some bad side and these bad things are more dangerous for children. In this modern era all most every children use internet but most of the time they are prone to bad things. In this situation you need to block some unwanted web site or specific site on your computer to protect your children from potentially bad things on the internet or from abuse of the internet. So today in this article we are going to discuss about how to block a website on your computer which is harm full for your family or child. If you block a website on your PC then your children cannot access that website on your PC. So let’s start the procedure.                                                          
Block+website+on+PC

Steps to block a website on your computer

Here we have listed two methods which will helps you to block a website on your PC. So follow the methods carefully.

Editing Windows Hosts Files

By editing your windows operating system’s hosts file you can block a website on your computer. To do that follows the instruction.
  • First of all open Run. Now copy the below code and paste it on Run and then hit Enter. Notepad %windir%\system32\drivers\etc\hosts . Alternatively navigate the path c:\windows\system32\drivers\etc and now open etc folder and then open hosts file with Notepad.
  • After opening hosts files in notepad go to the bottom of the notepad and here you will see something like 127.0.0.1 localhosts.
  • Under 127.0.0.1 localhosts you need to enter your desired website which you want to block on your computer. For example
127.0.0.1 localhost
127.0.0.2 Facebook.com
127.0.0.3 Tricksforums.com
127.0.0.4 yourdomin.com
                   hosts%252520file_thumb%25255B1%25255D
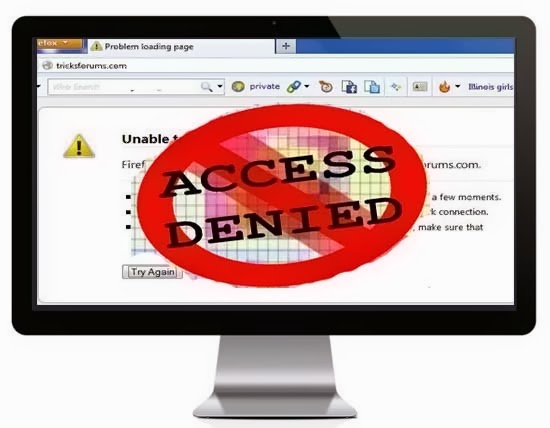
  • Now save the file and exit it. After saving reconnect your internet to take effect in changes. When anyone tries to open blocked website on your computer they will get problem loading page error.

           problem%252520loading%252520page_thumb%25255B3%25255D
Note: During saving the hosts file if you get this error like below image then you need to change permission.
                                  error_thumb%25255B4%25255D
  • When this error is appear then select NO. Now perform a Right click on hosts file and select Properties.
  • Now switch to security tab and hit on edit. Now select user and check the box Full control and click on Apply.
security%252520tab_thumb%25255B1%25255D         obtain%252520permission_thumb%25255B4%25255D
  • Now you can save the hosts file by doing above steps.

Open DNS

Open DNS is web content filtering and security service and with the help of Open DNS you can block adult content or any other harmful website on your PC. When anyone try to access any harmful site on your PC then Open DNS automatically detects it and blocks it. Now follow the below steps to configure Open DNS to prevent access of unwanted and harmful websites on your Computer.
  • Go to Control Panel then Network and Internet and then Network and sharing center.
  • Now click on Change adapter Settings and select your active connection. Now perform a Right Click on that connection and select Properties.
  • Now select Internet Protocol Version 4(TCP/IPv4) and then hit on Properties.
                        IPV4_thumb%25255B3%25255D
  • Now select the option Use the following DNS server address and enter the following DNS address 208.67.222.123 and 208.67.220.123.

                                 enter%252520DNS_thumb%25255B1%25255D
  • Now save the settings and reconnect the internet and try to open harmful website to check weather it works or not.

Conclusion

There are many software’s are available which can able to block website on your Computer. But the above two methods are simple and anyone can do it and in this method you don’t need to install any kind of software or tools.
If this article is helpful for you then don’t forget to share with your friends.


Best 3 Method to Convert YouTube Video to Mp3


YouTube is the world’s largest Video sharing website on the Internet. Every day millions of people upload video to YouTube and watch those videos and sometimes we download video from YouTube. But sometimes instead of watching and downloading video from YouTube, we just need audio part of a video because in some cases we have difficulty in finding a particular music or Mp3 in music store but yet manage to find it in a video on YouTube. So if you find your favorite music or MP3 in a video on YouTube and want to save permanently as Mp3 or audio mode in your music library but you don’t know the process then read this, because in this article we are going to tell you some best method to convert YouTube video to Mp3 file.
                                                                   

Convert+Youtube+video+to+mp3

How to Convert YouTube Video into Mp3 File?

Here we listed 3 best ways to convert YouTube video into Mp3 format which are given below

Convert YouTube video to Mp3 format using Online Service

If you find your favorite music or MP3 in a video on YouTube and just want Mp3 only then you can convert YouTube video into mp3 through some website. Just for an Mp3 you don’t need to download the video because there is some websites are available which offers to convert YouTube video into Mp3 file. The websites are as follows.

Listen to YouTube

Listen to YouTube is a most convenient online tool that allows you to convert YouTube video to Mp3 audio file. This is fast, free and there is no sign up required, all you need to enter a YouTube video URL in the empty box and then select go to download audio file of that video.

YouTube Mp3

YouTube Mp3 is an excellent online service that that allows you to convert YouTube video to Mp3 for free of charge. It provides Normal and High quality Mp3 audio file. Just paste a YouTube video URL in the allotted field for conversion to Mp3.

VidtoMp3

VidtoMp3 is a brand new website that allows you to download YouTube video and audio from non-copyrighted video file. It support all of your favorite sites like YouTube, Megavideo, Dailymotion, Metacafe, Myspace, Vimeo, Google video and many more. Just enter a video url from YouTube or any other site in the required field for convert to Mp3.

FLVTO

FLVTO is an amazing online tool that converts YouTube video into Mp3 file format. Not only YouTube it support Video from Facebook, Metacafe, vimeo,m Dailymotion etc. You can use it from Linux, Mac and windows PC even an Iphone. Just enter video url in the allotted field for conversion.

IX Converter

IX Converter is another excellent online media converter which also converts YouTube video into Mp3 format. It provides Stander and High quality audio file but high quality audio is only available for high quality video. It is a bit different from all above site because not only mp3 also it can convert YouTube video into 3gp, MP4. FLV and AVI format.

Convert YouTube video to Mp3 format using Free Software

If you don’t want to convert YouTube video to Mp3 in online then you can convert using free software called YouTube To Mp3 Converter. You can convert any time once you install that software in your PC but before conversion you need to download video from YouTube.

Convert YouTube video to Mp3 format using Browser Extension

Also you can convert YouTube video to Mp3 directly using browser extension in your web browser. So install extension in your browser from the given link.
For Mozilla Firefox:      Install Extension
For Google Chrome:     Install Extension

Conclusion

These are the some ways to convert YouTube video into Mp3 file format, but we are not encouraging anybody to use YouTube only for download songs that could be purchased on music store. Use these tools only when you are not found music or audio in any music store.
Hope you like this ,if so then give your feedback and share with your friends.

How to Convert PDF to JPG Online for Free? 

PDF stands for Portable Document Format and most of us aware about PDF files. PDF files are great for preserving integrity of a document. But sometimes PDF files can be a bit of hassle for you when you are trying to insert a PDF files into another documents or presentation and then you need to convert PDF files to JPG format. Have you download a PDF file with image and want to use it as a image then you can convert it into image without any software because there are some websites are available that allows you to convert PDF files to JPG online for free and today in this article we are discussing about How to convert PDF files to JPG online for free?


Convert%252520PDF%252520to%252520JPG%25255B5%25255D

Why Convert a PDF file into JPG image file?

There are several reasons why you need to convert PDF files into JPG files format. Some reasons are as follows.
  • To open PDF files you must have installed an external application like Adobe Acrobat Reader or any other while JPG does not.
  • If you want to insert PDF file into a presentation or any other documents then you can’t do it easily while you can easily insert JPG file.
  • Browsers have built-in capability to display image while PDF document require an external application or plug-in which may have or not.
So in some specific cases converting PDF to JPG can be solves the problem and fortunately there are some websites are available that allows you to convert PDF into JPG online for free of cost which are as follows.

Best 5 Website to Convert PDF to JPG online

There are many website are available to do that work but here we listed only best 5 website that gives better result than others.

ZAMZAR

ZAMZAR is one of the best and most popular online file conversion sites where you can convert PDF files into JPG format. Just not only PDF to JPG also it can convert any file and media format to another file and media format. There is no registration requires, the conversion process is simple just choose the file then choose the format to convert and then enter your email address to receive converted file through email. But the file size is limited to 100 MB.

Small PDF

SmallPdf is a great online tool that allows you to convert PDF to JPG for free. It is specially developed for PDF files. They provide PDF based service like Compress PDF, Convert PDF to JPG or JPG to PDF and Merge PDF files. The conversion procedure is simple just drag and drop or choose PDF file in the allotted box then they will convert PDF into JPG image. After that you can pick the picture and save in your PC.

NEEVIA

Neevia Technology has a website which facilitates the conversion of PDF documents to JPG image file. Not only convert also it can Merge PDF, Compress PDF, Resize PDF and you can give a watermark on your PDF file. To convert PDF to JPG just choose PDF file and select Output Format as JPG then choose delivery method either waiting for conversion or enter your email to receive download link. But the file size limited to 2 MB per file.

PDF2JPG (Beta)

Pdf2jpg is the brand new online service that allows you to convert PDF file into JPG format online for free. There is no registration or installation is required all you need to Choose the pdf file then convert into jpg format and it produce high quality image. Also you can download your image as a zip file. The file size limited to 25 MB. But it is still in Beta mode.

Freepdfconverter

Freepdfconverter is another online PDF converter that allows you to convert PDF file in JPG file. Conversion process is simple like above sites. Also you can convert PDF to word, excel and power point documents format. If you want to convert unlimited PDF to JPG then you need to sign up there.

Conclusion

These are some best website where you can convert PDF document to JPG image file online for free. Also there are many third party software are available to convert PDF document into JPG image file. But why download a software for this little task so it is best to convert it through online.
Hope you like this information, if so then share it and give your feedback.


Top 5 Best Free Online Photo Editing Websites 

Need to edit a photo but there is no photo editing program or don’t know how to edit photo on photo editing software like Photoshop? Then there is a way in which you can edit your photo without installing any photo editing program and you don’t need any technical knowledge or experience. If you want to make a slight change, enhance or want to make a funny photo then you can easily do it online for free. There are a lot of online resources available where you can easily edit photo with just few mouse click and in just few seconds. So if you are struggling to edit a photo then read this article because here we collected some best free online photo editing service although there are lot of resource available and we are discussing how to edit photos online for free.                                                               
edit+photo+online

Top 5 best Free Online Photo Editing Websites/ Service

Be Funky

BeFunky is great online photo editor that allow people to easily create photographically rich and artistic result from their digital photo without need any technical knowledge or experience. From here you can add speech bubbles, accessories, graphics and lot’s of object to your picture and also you can turn an ordinary image into a funny comic. To use this online application you don’t need to create account or registration however if you create a free account then you can get more benefits like you will able to store your image in their photo library , add title and description, Bookmark your favorites effect and item etc.

Fun Photo Box

FunPhotoBox is another online photo editing tool that allows you to create funny picture from your photo. There is no sign up or registration requires editing or creating funny photo. It is completely free and you don’t need to have any designer skills for editing, just upload your photo then choose any photo effect and then apply to your photo and save it in your computer. Also you can create a Facebook Cover, Animation, Cards etc with the help of this site.

Funny Photo

FunnyPhoto is one of the best online image editors that allow peoples to edit, enhance photo or create a funny photo from your image for free and there is no registration requires to that. Just choose any photo effect from thousand of effects then upload your photo from your computer and applied effect to your picture, you can select your picture from Facebook or any URL. Also you can make a cartoon from your photo. You can use this application in your iOS or Android device by downloading their app from Google Play.

DUMPR

DUMPR brings awesome visual effect to the mass with just simple few mouse clicks. Here you can get lots of free photo template and you can add those effects to your photo.

Write On It

WriteOnIt is an amazing online photo editing tool. Here you can easily create fake picture, captions, fake magazines cover (wired, playboy, play girl, glamour, Time) and other funny jocks for you and your friends. Also you can place your face on the body of the world top celebrities and have a fun with your friends.

Conclusion

These are some best online free photo editing service although there are lots of resources are available to do the same work. So if you don’t have any design skill then you can try these online photos editing tool which may help you to edit your photo.
If you know any other best site or online image editing tool then share with us in your comment. Hope you like this, if so then share it with your friends.


10 Tips to Stay Safe Online 

Now day’s internet becomes most essential things. Internet brings the world in our fingertips and for this reason online activity like Shopping, Online Banking etc is increased day by day. But increasing online activity cyber crime also increases in the same row. Thus online safety is a huge issue and many users are unaware of how to ensure that their online activity or transactions are safe, private and secure. So here we listed 10 simple steps to stay safe online while shopping, banking or doing any online activity.

Stay+safe+online
                                          

10 Tips to Stay Safe Online

Check out these below tips to make sure you’re doing everything you can to avoid becoming a victim of cyber crime.

Avoid phishing site and email from unknown source

The most common method used by cyber hacker to steal customer information is phishing site and promotional email. Hacker setup a website similar likes the brand website and they send a promotional email with link for shopping in maximum discount. If you visit this link then you need to enter your all personal information including your Credit or Debit card information for shopping and then you are a victim of cyber crime. So if you receive an email from a company and asking you to shop or visit a website then carefully check the domain of the email is being sent from or url of the link they land on and all email address and links should contain company’s official domain.

Use a good antivirus and keep update regularly

If you are using internet regularly then you must have a good antivirus in your system, because virus or malware can still your information or data and can damage or destroy all data and information. But having a good antivirus is worthless if you don’t update regularly, because antivirus program designed for protect against known viruses, but with new viruses emerging daily, antivirus need to be update daily.

Always use HTTPS in the URL rather than HTTP

When you are doing online activities like shopping or online banking then use HTTPS:// instead of HTTP:// before URL in all pages including login page, asking for customer detail such as billing or shipping address and payment information. In the HTTPS:// “S” denoted as the secured connection between customer computer and company’s server.

Use hard guess password and change password after sometimes

Always try to use hard user name and password where you are asking for login or sign up. Always keep your password private and change it after sometimes. Don’t use same password for different account. Use a password which is combination of Upper case and lower case letter, number, symbols special character and space, because this combination is hard to crack.

Don’t use public computer and Internet or Wi-Fi for banking or shopping

Avoid using public computer and network for online activities such as Online shopping or Banking, because public computer may contain malicious program that can steals your personal information including Credit card information. Most Wi-Fi doesn’t encrypt your data so any cyber hacker in your neighborhood can steal your information.

Avoid strangers on social media

Many retailers and online marketing agent use social media and send promotional massage to promote their business and in the same way hackers can steals your information. Bitdefender recommends treating massage from stranger as spam, so ignore them.

Use updated and modern web browser

Try to use updated and modern web browser for browsing internet, because most of modern browser has inbuilt capability to detect spoofed website. Update will keep you ahead of would be identity thieves and keep you safe.

Avoid pop-ups

If a pop-up window will appear during browsing internet promising gift card or cash by taking a survey or answering question then just close it.

Be careful with your mobile device

Now days a smart phone can do everything a computer can do. But that’s does not mean they are as protected against malware or viruses. Many phones are not equipped with antivirus program and it helps hacker to send a malware in your phone to steal your information you have entered. So make sure that your phone is password protected and any information you may have stored on it is not easily accessed.

Review your transactions and bank statement often

Check your truncations and statement after every transaction which is made by online banking or by credit and debit cards, because unfamiliar charges on your credit card or bank statement are the first sign of identity theft. So if you find any unauthorized charges then contact your bank or Credit Card Company immediately.

Conclusion

These are some tips which may helps you to stay safe online while shopping or online banking. Also if you feel any website makes you feel uncomfortable and unsafe the leave that website and disconnect your computer.
Hope you like this and if you like this then share with your friends and helps them to stay safe online.


How to Use Keyboard As Mouse in Windows 7,8,Vista and XP? 

Sometimes our mouse refuses to work while we have some important work and this was defiantly irritating for all of us. This problem will occur due to several problems such as device driver got corrupted so that computer is failing to recognize the mouse, hardware problem in mouse or mouse battery has drained off or some other problems. Sometimes it solved by doing simple task such as uninstall the driver and reinstall it, Restart pc, unplug mouse and then plug in it. But doing all possible method if the problem still means your mouse not worked then don’t wish to wait till you get a new mouse because you can use your keyboard as a mouse in your Computer or Laptop. So if you want to use your keyboard as mouse then read this article to end because here we are describing how to use keyboard as mouse in your computer or laptop.
                                                          
Use+keyboard+as+mouse

Simple steps to use keyboard as mouse

Windows operating system has inbuilt feature called MouseKeys which will help you to use your keyboard as a mouse when your mouse stopped working. But not much people are aware about that function. If you are one of them then follow the given steps to make your keyboard as a mouse.

For Windows XP users

If you are using windows XP then you need to follow the given steps.
  • Go to Control Panel and then click on Switch to Classic View.
  • After that click on Accessibility Options.
  • Now Accessibility Options window will appear and here switch to Mouse tab.
  • Then check mark on Use MouseKeys and then OK.
                                             
Accessibility+option
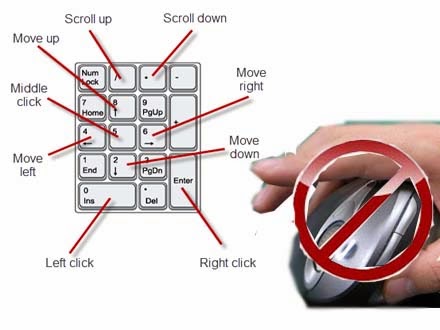
  • After doing all above steps active Number Lock by pressing NumLock key on your keyboard and then you will be able to control mouse pointer using the arrow keys on numeric keypad.

For Windows 8, 7 and Vista users

If you are using windows 8, 7 or Vista then you need to follow the given steps.
  • Go to Control Panel and then open Ease of Access.
  • Then click on Change how your mouse works under Ease of Access Center.
                                                                 
Ease+of+access+center

  • After that check the box (Tick) Turn on Mouse Keys then OK. Also you can set up the acceleration and speed of your mouse pointer movement. So if you want to customize it then click on Set up mouse keys option and customize according to your needs.
                                                         
Turn+on+mouse+keys

  • Alternately you can active mouse keys instantly by pressing Alt + Shift + Num Lock key on your keyboard.
  • That’s all and now you can use your keyboard as mouse.
Also you can use a third party tool called NeatMouse for windows computer that allows you to control mouse cursor via keyboard. This is small and portable program.

Conclusion

This is the process to make your keyboard as a mouse which will help you to run your work even your mouse refuses to work. So active MouseKeys feature in your computer or laptop because you don’t know when your mouse stopped working.
We hope you like this and if you think this helpful then share it with your friends and help them. If you face any problem during this operation then contact us or leave a comment for us we will help you.


Simple Steps to Disable/Block USB Ports in Windows Computer 

Sometimes someone connected an unauthorized USB device in our computer and copied our files or data and Now days it’s become a huge problem facing by many computer users. So how often you lost your data? If you lost your data often then you need to disable or block USB ports in your computer to prevent people from taking out data from your computer without your permission. Blocking or disabling USB ports in your computer you can also prevent spreading viruses through the use of USB devices (pen drive, flash drive).
                                   
disable+usb+ports


How to Disable/Block USB ports in windows PC?

Here we listed some possible way to disable USB ports which will help you to prevent data theft from your computer and spreading viruses in your computer through USB drives. So follow the below steps to block USB ports.

Disable USB ports through Registry

  • First of all open windows Registry Editor. To open windows Registry Editor goes to Run (windows key + R) and type regedit and then hit Enter.
  • Now navigate the key Computer\HKEY_LOCAL_MACHINE\SYSTEM\CurrentControlSet\services\USBSTOR
  • In right pane of that windows find Start and perform a double click on it.
  • Now in the value data box change the value from 3 to 4 then OK and this will disable USB ports in your PC.
                                                   
Registry+editor

  • If you want to enable USB ports after disable then just change the value from 4 to 3.
Note: This step also disable USB peripherals device. So don’t use this step if you connected USB mouse or keyboard in your computer.

Disable or Block USB ports from Device Manager

If you don’t want to do anything with your windows registry then you can disable USB ports in your pc from device manager of your computer.
  • Go to Run and type devmgmt.msc then hit Enter and it will open Device Manager.
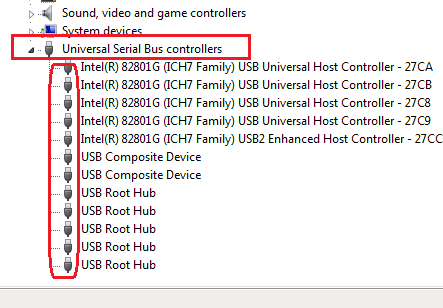
  • Now navigate Universal Serial Bus Controller and expand it.
                                                           
USB+Controller

  • After expanding USB controller, perform a right click on selected one and select Disable. Do the same on all of the expanding USB options.
  • Now your USB ports are block. If you want enable USB ports then just right click on it and select Enable.

Disable or block USB ports by using third party tool

Also you can block or disable USB ports in your computer by using a third party software or tool called USB Port Locked . This is a small, simple and portable tool that allows you to disable and enable USB ports in your computer.
                                                             
lock+usb+ports

 This program is protected by a password that means no one can access this program to lock or unlock USB ports except you. This application supports USB removal disk exclusively, that means it has no result when used foe USB peripherals such as mouse, key board, webcam etc. This tool works flawlessly on every windows operation system on both 32 and 64 bits versions.

Conclusion

These are some possible ways to disable or block USB ports in your computer which helps you to prevent data theft and spreading viruses through USB removals devices in your PC. If you used USB connected mouse or keyboard then we suggest you to follow 3rd steps to block USB ports in your PC.
If this article helpful for you then share it. If you have any problem regarding this topic, leave a comment, we will help you.


How to Make Your Own GIFs in Simple Steps

GIF stands for Graphics Interchange Format and now days animated GIFs become so popular. Sometimes you may have seen some moving or playing banner and animation in many sites on the internet, but they are not any type of video format, actually they are an image format called GIF. Animated GIFs are attracting everyone than a normal image and it makes some extra impression and that’s why it becomes so popular. Do you want to create your own GIFs? If the answer is yes! Then read this, here in this article we explained what GIFs are and how to make your own GIFs.
gif_thumb%25255B4%25255D

What GIFs actually are?

GIF or Graphics Interchange Format is one of the few graphics image formats that can be used to create simple animation. In this format images are compressed to their size without losing quality of the image. GIFs used for several purposes such as online advertising, creating presentation and for fun. Also you can memorialize your favorite scenes form movies or any video in GIFs format.

How to Create Animated GIFs?

Making your own animated GIFs is not a very difficult task if you know some design skill. But if you don’t have design skill then you don’t need to worry about that because here we guide you step by step to make your own GIFs. Here we describe two ways to create animated GIFs, First one is Online and second one is Offline.

Make your own GIFs Online

In the method you need to go one of the blow website to create GIFs. There are numbers of websites are available which will help you to make your own GIFs from images and video, but here we listed only best 3 online GIF maker among them.

Make a gif

Make a gif is a famous application on the internet to make animated GIFs from image and videos also. It has very user friendly interface. There is no sign in recommended to create a GIF.

make-a-gif_thumb8

To make a GIF all you need to just upload images from your pc then choose sequence of your image then create and finally you make your own GIF. But after creating GIF they provide a little watermark on your GIF, so if you want to remove that watermark and more flexibility then you need to sign up. You can to sign up with you facebook or twitter account. Also it allows you to make GIFs directly from a YouTube URL and by uploading a video from your PC.

ImgFlip

Imgflip is another great website to create GIF either form images or videos. It provides high quality GIFs online for free with lots of customization and there is no limit on number of images.

image-flip_thumb9

To create GIF from images just Upload images from your computer then Arrange images then Adjust option such as Delay, wide, height and quality and then Generate. After creating GIF just right click on it and download also you can share it with your friends on social networking site directly.
Also it offers to create GIFs from existing video or directly from YouTube URL. But in basic account you can’t use a video larger than 35 MB. If you buy pro account then you can use 100 MB video for upload and 70 MB video for URLs. So, overall it is a great site for you to create your own GIFs.

GIF Maker

GIF Maker is another good online tool that allows you to make your own animated GIFs from images online freely and easily. There is no registration or sign in required. Also you can create your own GIF directly from YouTube video by giving the video URL. It is so user friendly and anyone can create animated GIFs.

GIF-MAKER_thumb7

To make GIFs just upload images from your computer but image size that your uploading should be less than 2 MB and image format that are supported png ,jpg or gif then select canvas size and animation speed from control panel and then create. After creating you will be able to download your own GIF.

Make your own GIFs Offline using software

In this method you need to download good GIFs maker software and follow the steps to create GIFs. Here we are discussed about 2 best and free GIF maker software however there are not many good GIF maker software or programs are available for free.

Create GIFs using Free Video to GIF Converter

Free Video to GIF Converter is a tool that enables you to easily create GIFs from a video clips. This application is totally free and it supports a wide range of video format including MPEG, MOV, AVI, WMV, FLV, MP4, 3GP. To create GIF follow the below steps.
  • Download Free Video to GIF Converter and install it in your PC like others programs.
  • Run the program and click on Browse and navigate the required video file.
  • When video is loaded, move to the Extract Frames section and enter start and end time of your GIF, change height and wide. Also you can choose total number of frames extract per second, once you configured the settings then click on Next.
Video-to-Gif-converter_thumb12
  • Now you are on Create GIF tab and here you will see the preview of each frame. So remove all unnecessary frames before creating GIF. Also you can choose the quality of your GIF its either normal or high quality. When you are completed just click Make GIF and now you are successfully create your own GIF.
Video-to-Gif-converter2_thumb3


Create GIFs using GifApp

GifApp is an open source portable tool that allows you to easily create your own GIFs using multiple images and output GIF quality is quite good. It is totally free and has clean and user friendly interface. The best part is that you don’t need any extra knowledge for creating GIF on it, just add image and make your GIF.
  • Download GifApp and Run it in your PC. It is portable app so you don’t need to install it.
  • Click on Add an image and import your images.
GifApp_thumb3
  • After loading images change your image dimension and delay and also you can put some effect from effect option. Once you completed, just click on Save to GIF.
  • Now you are successfully created your own GIF.

Conclusion

These are the process you need to know if you want to create your own GIF. Here we describe both online and offline method. So let us know which method you are like to use. If you face any problem while creating your GIFs then leave a comment for us and surely we will help you. Also don’t forget to share with your friends.


How to Save Webpage as PDF

Everyone surf the internet for several purpose but most of us surf the internet to find some information or article. While we get the information or article as our wish and if we think that the article is helpful then we want to save it for offline viewing in future. Some people consider copy and paste method to store the article. But why you follow the copy paste method while you can save a webpage as PDF file. Yes! There is a simple way you could use to save webpage as PDF directly through your web browser for offline viewing and printing without installing any software and in this article we are explained you how to do that.

save%252520webpage%252520as%252520pdf_thumb%25255B6%25255D

How to Save Webpage as PDF?

There are different ways to for Google Chrome and Mozilla Firefox. So follow the steps as given below.

Save Webpage as PDF in Google Chrome

If you are using Google Chrome as your default web browser then you don’t need to install any software or any extension, because Chrome browser act as a PDF writer itself. So, if you don’t have installed it then install it first and then follow given the steps.
  • Open Chrome browser and go to the webpage which you want to save as PDF.
  • After opening the webpage, press Ctrl + P (if you are on a Mac then press cmd + P) and it will open print dialog box in your chrome browser.
  • Now click on Change button beside of destination from the left pane.
click%252520on%252520change_thumb%25255B142%25255D
  • Once you click on change button then a new popup will appear and select Save as PDF option under Local Destination.
save%252520as%252520pdf_thumb%25255B2%25255D
  • Now click Save and your webpage will be save and stored in your PC as a PDF file. Now you can use it for future reference.
save_thumb%25255B2%25255D
  • In stored PDF contain Date and webpage Title at header and contain Webpage URL at the Footer, if you don’t want to include it then just uncheck Headers and Footers option.
check%252520or%252520uncheck%252520the%252520option_thumb%25255B4%25255D
  • Also you can check or uncheck the option Background colors and images to get colors and image of that webpage.

Save Webpage as PDF in Mozilla Firefox

Mozilla Firefox is one of the best web browsers, but in case of Mozilla Firefox you need to install an Add-on to converting webpage or save a webpage as a PDF file.
  • First install the Add-on called Save as PDF in your Firefox.
  • Open any webpage as your wish and click on Save as PDF’s add-on icon from the top of your browser.
saveas%252520pdf%252520icon_thumb%25255B2%25255D
  • After few seconds it will start the download PDF file. Now your webpage will stored as PDF file in your computer.

Use online service

Also you can convert a webpage into PDF file through online. There are lots of website are available that allows you to save a webpage as PDF by giving the URL of the webpage on that website. Some websites are Web2pdfconverter, Htmlpdf, pdfcrowd etc.

Conclusion

With the help of the above method you will be able to convert any webpage into PDF which will help you to view an article or some interesting information even you are offline. So, try it and give your feedback here.
Hope you like this article, if you like it then don’t forget to share it.

Tricks to View Webpage in 3D Mode 

Hello friends, here is the funny trick to view any webpage in 3D mode in your web browser. To view webpage in 3D you need to have installed Mozilla Firefox or Google chrome. After follow this trick you will able to view any webpage in 3D which will amaze you and your friends. This is a simple and small tricks. To do that you don’t need to have any technical knowledge. So check how to view webpage in 3D.

View%25252Bwebpage%25252Bin%25252B3D_thumb%25255B3%25255D
3D view webpage in Mozilla Firefox

Firefox is well known and best web browser in the world. If you are using Firefox then you can use this trick without installing any add-on because Firefox have inbuilt feature called Web console which will help you to view a webpage in 3D. Now follow the steps as given below.
  • Open Firefox and open any website page such as Google.com, Facebook.com or other as your wish.
  • After opening full webpage then press Ctrl + Shift + K and it will open Web Console option at bottom of that webpage.
  • Now go to right side of web console option and you will see a 3D box at top right side. If you hover your mouse on it then it show you 3D view. Just click on that 3D box.
click%252520on%2525203d%252520box_thumb%25255B8%25255D
  • Now your current web page turns into a 3D web page. Now dragging the page with your mouse and you will see the page in 3 dimension.
  • NOTE: If this option didn't worked for you then install Tilt 3D add-on in your browser and then try to view web page in 3D.

3D view in Google Chrome

If you are using Google Chrome as your web browser then you need to install an extension called 3D view for webpages in your browser, because there is no inbuilt features for 3D viewing in chrome.
  • First of all open your Chrome browser and install the extension called 3D view for webpages.
  • After adding the extension in your browser, open any webpage.
  • Now go to top right of your browser and you will see a 3D box icon and just click on it.
click%252520on%2525203d%252520icon_thumb%25255B2%25255D
  • Now you will see the current webpage in 3D.
That’s all. So try it now and surely it will amaze you and your friends. Hope you like this, if so then share it with your friends.


Easy Way to Download Wikipedia Articles as PDF for Offline Reading 

We know that Wikipedia is the world largest encyclopedia and most trusted source of information on the internet. The articles on Wikipedia are written by many expert and for this reason Wikipedia articles are more informative than other source. Now days Wikipedia becomes a favorite source of information for students. Many students turn to Wikipedia to find article for their assignment in school or college or try to find solution of a problem and then they want to save that article for offline viewing. Not only student, most of the Wikipedia users want to save or download their favorite articles for offline reading and printing. So if you are one of them who want to download Wikipedia articles then this article will help you, here we have explained how to download Wikipedia articles as PDF. Also you can download Wikipedia article from its data base.

download-wikipedia-articles_thumb2
How to download Wikipedia article as PDF document?

To download or save Wikipedia articles you need to follow the given steps.
  • Open Wikipedia and search an article which one you want to download.
  • After opening the article, find an option Called Print/Export from the left pane of that Wikipedia article’s page.
  • Now click on Print/Export and here you will three option, just click on Download as PDF.
  Download-as-PDF_thumb5
  • After that Wikipedia rendering your article as PDF and it will take few seconds depends upon size of your article.
Rendering-article_thumb2
  • Once the Rendering process is finished, Wikipedia provide you a link where written as Download the file. So just click on Download the file to download the article as PDF.
download-the-file_thumb4
  • After downloading the file you can view it offline and you can print it.

How to Download Wikipedia Articles from its dump database?

Wikipedia officially makes available free dump databases and it also allowing the user to download thousands of article from dump database, so you can download the full Wikipedia content and use it offline for reading or printing.
But before anything you need to download the most popular Wikipedia reader called Kiwix. It is an open source software so you can get it for free and it is specially designed for reading Wikipedia offline. It is available for all operating system. With the help of this software you can download Wikipedia latest/updated articles database.
  • First of all Download Kiwix and then get the Wikipedia Database and choose the database as your wish.
  • If you wish to use English database then you can get it from Here which is 730 MB.
  • After installing Kiwix and downloading database, you can load the Wikipedia database for offline reading. To load database open Kiwix then go to File then choose the database which you downloaded with extension of .zim or .Zimaa.
We recommends to use a third party software to download Wikipedia database to reduce the load of Wikipedia servers.
  • That’s all, now feel as reading Wikipedia as online.
Hope you like this, if so then don’t forget to share with your friends and give your feedback here. During this whole process if you face any problem then leave a comment for u we will help you.


  • RSS
  • Delicious
  • Digg
  • Facebook
  • Twitter
  • Linkedin
  • Youtube